Rendering Data in Yii 2 with GridView and ListView
In my previous article about Yii 2.0, I introduced the ActiveRecord
implementation. Once you have some data in your database you’ll want to
be able to show it. Yii uses DataProviders to interact with data
sources and it provides some widgets to output the data. Of these, the
ListView and GridView provide the most functionality.


A small wrap-up of this database design and its Yii models which I’ll be using in this example:
The documentation uses quite a simple example inserting a few models in an array like so:
In the view, we’d render a table with a GridView. I’m showing a few columns in increasing complexity, a simple list of the article first:
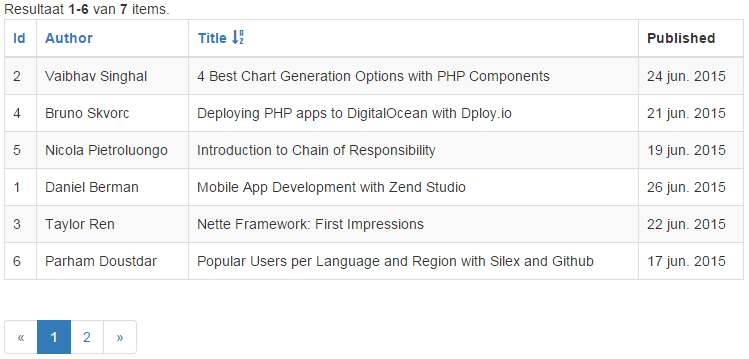
I do admit that I cheated slightly by defining a page size of 6 and three columns by which it can sort; more on that later. Note the summary at the top, the sort links in the column headers and the pager at the bottom. Everything is formatted in a localized format (Dutch for me) where applicable. I needed no additional code to get the handling of links for the sorting or next pages working. The links are all automatically generated by the widget and actions are handled by the DataProvider. This component makes life really easy out of the box.
Since I joined the articles with other tables, we can use that data as well in a very easy
The GridView actually has quite a few extra attributes through which you can configure it. I’ll use another example:
Let’s go over some code:
One thing to note that for pagination to work the DataProvider needs to know the total number of results available. The
The ListView and GridView are very practical widgets which allow you to quickly show the data that you want. If you want even more from your GridView, then be sure to check out the ‘GridView on steroids’ made by Kartik Visweswaran. This adds a lot of additional functionality to your grids allowing the user to fully customize the way the data is shown. Be sure to check out all the other components from Kartik as well!
From Site Point
The example
I’m going to work with the database example that I introduced in my previous article again. Not very original, but quite useful as an example; a blog like SitePoint.A small wrap-up of this database design and its Yii models which I’ll be using in this example:
- The
Authorsmodel has one relation method callgetArticles()that provides anArticles[]attribute to the model. - The
Articlesmodel has one relation method callgetAuthor()that provides theAuthorand a methodgetTags()that provides theTags[]. - The
Tagsmodel has one relation method callgetArticlesthat providesArticles[].
DataProviders
There are three different types:- The
ActiveDataProvideris fed through an ActiveQuery instance and usually holds an array of models. You’ll normally use it to hold and render data that can be built from normal ActiveRecord instances with their relations. - The
ArrayDataProvideris built using an array of data. This is quite useful when building all sorts of reports based on multiple models and/or custom aggregations. - The
SqlDataProvideris a very useful one for the SQL masters among us. It is an easy way to get the data of those complex queries.
ActiveDataProvider
I already explained that this is populated with an ActiveQuery object. Anymodel::find() will return an ActiveQuery object so creating one is quite simple./* A dataprovider with all articles */
$dataProvider = new ActiveDataProvider([
'query' => Articles::find()->with('tags'),
]);
/* Get all the articles for one author by using the author relation define in Articles */
$dataProvider = new ActiveDataProvider([
'query' => Articles::find()->with('author')->where(['Name'=>'Arno Slatius']),
]);
/* Be careful with this! */
$dataProvider = new ActiveDataProvider([
'query' => Articles::find()->with('author')->where(['Name'=>'Arno Slatius'])->orderBy('Published'),
]);SqlDataProvider
This one will gather your data based on a SQL statement. My example doesn’t really justify the use of SQL but I’ll do it anyway to show something and throw in some aggregation;$dataProvider = new SqlDataProvider([
'sql' => 'SELECT Name, Title, COUNT(ArticleTags.ID) AS TagCount ' .
'FROM Authors ' .
'INNER JOIN Articles ON (Authors.ID = Articles.AuthorID) ' .
'INNER JOIN ArticleTags ON (Articles.ID = ArticleTags.ID) ' .
'WHERE Name=:author' .
'GROUP BY ArticleID',
'params' => [':author' => 'Arno Slatius'],
]);ArrayDataProvider
This might be the most useful component of the bunch. Anything that you’d normally put in a table that requires a bit more work to compose is well suited for an array data provider.The documentation uses quite a simple example inserting a few models in an array like so:
$dataProvider = new ArrayDataProvider([
    'allModels' => Authors::find()->all(),
]);init()
function which is available on almost all components. This is called
when the class is created and used (in this case) to prepare the data in
the provider.namespace app\data;
use \app\models\Authors;
use \app\models\Articles;
class AuthorsReportProvider extends \yii\data\ArrayDataProvider
{
/**
* Initialize the dataprovider by filling allModels
*/
public function init()
{
//Get all all authors with their articles
$query = Authors::find()->with('articles');
foreach($query->all() as $author) {
//Get the last published date if there are articles for the author
if (count($author->articles)) {
$lastPublished = $query->max('Published');
} else {
$lastPublished = null;
}
//Add rows with the Author, # of articles and last publishing date
$this->allModels[] = [
'name' => $authors->Name,
'articles' => count($author->articles),
'last' => $lastPublished,
];
}
}
}$this->allModels, is filled with the data we need.Visualizing the data
We’ve got a data provider but now we want to render what’s in there, right? Yii provides two components to visualize the data put into the data provider.- The
GridViewwill put the data in an HTML table. If properly configured, it’ll automatically add headers that you can click to change the sorting, pagination to limit the number of items shown at once to the user and a summary showing the total number of results available. - The
ListViewallows you to specify a partial view with which you can render each of the models in the data provider in a specific way. A very common way to go about this is using this to render the content of<li>elements of an ordered or unordered list.
/* A dataprovider with all articles */
$dataProvider = new ActiveDataProvider([
    'query' => Articles::find()->with('tags','authors'),
]);with() method. This is known as ‘eager loading’, making the related data available immediately. When done without the with() you’d still be able to use the data available from the author and tags
relation in your views, but it would be loaded run time, also known as
‘lazy loading’. If you know you’re going to use related data, use with(). Eager loading performs a lot better than lazy loading.In the view, we’d render a table with a GridView. I’m showing a few columns in increasing complexity, a simple list of the article first:
<?= GridView::widget([
    'dataProvider' => $dataProvider,
    'columns' => [
        'ID',
        'Author',
        'Title',
        'Published:date',
    ],
]); ?>I do admit that I cheated slightly by defining a page size of 6 and three columns by which it can sort; more on that later. Note the summary at the top, the sort links in the column headers and the pager at the bottom. Everything is formatted in a localized format (Dutch for me) where applicable. I needed no additional code to get the handling of links for the sorting or next pages working. The links are all automatically generated by the widget and actions are handled by the DataProvider. This component makes life really easy out of the box.
Since I joined the articles with other tables, we can use that data as well in a very easy
table.column manner. Formatting of the data can also be customized using anonymous functions:<?= GridView::widget([
'dataProvider' => $dataProvider,
'columns' => [
'Title',
'author.Name',
[
'attribute' => 'author.Twitter',
'type' => 'html',
'value' => function($model) {
return Html::link('@' . $model->author->Twitter, 'http://twitter.com/' . $model->author->Twitter);
}
],
[
'attribute' => 'tags',
'value' => function($model) {
return implode(', ', ArrayHelper::map($model->tags, 'ID', 'Tag'));
}
],
'Published:date',
],
]); ?>yii\grid\Column so always look back at that class to see all the attributes and functions you can use. For instance, yii\grid\DataColumn has a $footer attribute. Add that to the configuration array of a column to set the footer text, and don’t forget to set showFooter to true in the GridView. The GridView actually has quite a few extra attributes through which you can configure it. I’ll use another example:
<?= GridView::widget([
  'dataProvider' => $dataProvider,
        'columns' => [
        ...
        ],
        'layout' => '{summary}{items}{pager}',
  'filterPosition' => FILTER_POS_FOOTER,
  'rowOptions' => function ($model, $key, $index, $grid) {
  },
  'emptyText' => '-',
  'showFooter' => true,
]); ?>layout attribute is a very useful one. It allows you to change the way the basic elements appear. You can add {summary}, {errors}, {items}, {sorter}, {pager}
some even multiple times; you might want a pager above and below the
items list, the same might go for the summary which basically shows the
total number of results and the number of currently shown results.
Errors are a list of errors that the filter outputs (if any). filterPosition allows you to
move the filter to the bottom, or inside the body. Normally it would be
included in the header part of the table, etc.Customizing Sorting and Paging
The GridView will do sorting and pagination for you by default. Its functionality is actually provided through configuration of theyii\data\BaseDataProvider
which can be initialized by supplying additional parameters during the
class’ initialization. Let’s start with simple pagination; by default,
it is set to defaultPageSize which normally gives 20 results per page. Change it by supplying a pageSize, or use it to display everything and turn off pagination:/* show 80 items per page */
$dataProvider = new ActiveDataProvider([
'query' => Articles::find()->with('tags'),
'pagination' => [
'pagesize' => 80,
],
]);
/* disable pagination, shows all items at once */
...
'pagination' => false,
...
'pagination' => [
'pagesize' => -1, //Alternate method of disabling paging
],
...Let’s go over some code:
$dataProvider = new ActiveDataProvider([
    'query' => Articles::find()->with('authors'),
    'sort' => [
     'defaultOrder' => [
         'Published' => SORT_DESC,
         'LastEdited' => SORT_DESC,
     ],
     'attributes' => [
      'name' => [
                'asc' => [
                    'author.Name' => SORT_ASC,
                    'Published' => SORT_ASC,
                    'Title' => SORT_ASC,
                ],
                'desc' => [
                    'author.Name' => SORT_DESC
                    'Published' => SORT_DESC,
                    'Title' => SORT_DESC,
                ],
            ],
            ... etc ...
     ],
    ],
]);defaultOrder changed, as
you might guess, the initial ordering of the GridView, should it be
rendered. In this example the ordering will be on ‘Published’ decending
and ‘LastEdited’ descending next.attributes will contain a
list of all sortable attributes from the GridView’s columns (the
attribute names here should match the attribute names in the GridView).
You can independently define how the ascending and descending result
will be sorted – again, this can be done on multiple columns in your DB.One thing to note that for pagination to work the DataProvider needs to know the total number of results available. The
ActiveDataProvider and SqlDataProvider are able to do it by default using database queries. If you use the ArrayDataProvider, you might need to do some additional work depending on how you fill the provider.Conclusion
The ListView and GridView are very practical widgets which allow you to quickly show the data that you want. If you want even more from your GridView, then be sure to check out the ‘GridView on steroids’ made by Kartik Visweswaran. This adds a lot of additional functionality to your grids allowing the user to fully customize the way the data is shown. Be sure to check out all the other components from Kartik as well!
From Site Point

Comments
Post a Comment